
Setting Up Your Impinj R700 Reader (7.x firmware)
Overview
This article provides a step-by-step process for setting up the Impinj R700 reader.
Downloads
Setting Up a New Reader
Step 1: Identify all the necessary equipment to start reading tags, which includes the following:
1. The Impinj R700 reader
2. UHF RFID antenna (global, or specific to the country you are in)
3. An antenna cable with the correct connectors
4. A standard ethernet cable
5. UHF RFID tags (global, or specific to the country you are in)
6. A PoE+ Power Source
Step 2: Using the Web UI
1. Connect the Impinj R700 via ethernet to your network or computer. If connecting directly to your computer, be sure to set your network to obtain IP addresses automatically.
2. Open the web UI by opening a web browser and navigating to http://impinj-xx-xx-xx (or http://impinj-xx-xx-xx.local, if you used an ethernet cable between the reader and your computer). The x's here represent the last six characters of your reader's MAC address. You can find the MAC address on a sticker on the side of your reader. If you get a message saying that this website is not secure, verify that you are on the correct URL, and proceed.
3. Once the URL is accessed, you will be prompted to login. The login credentials for the reader are below:
Username: root
Password: impinj
Once logged in, you should see the reader's Web UI screen shown below.
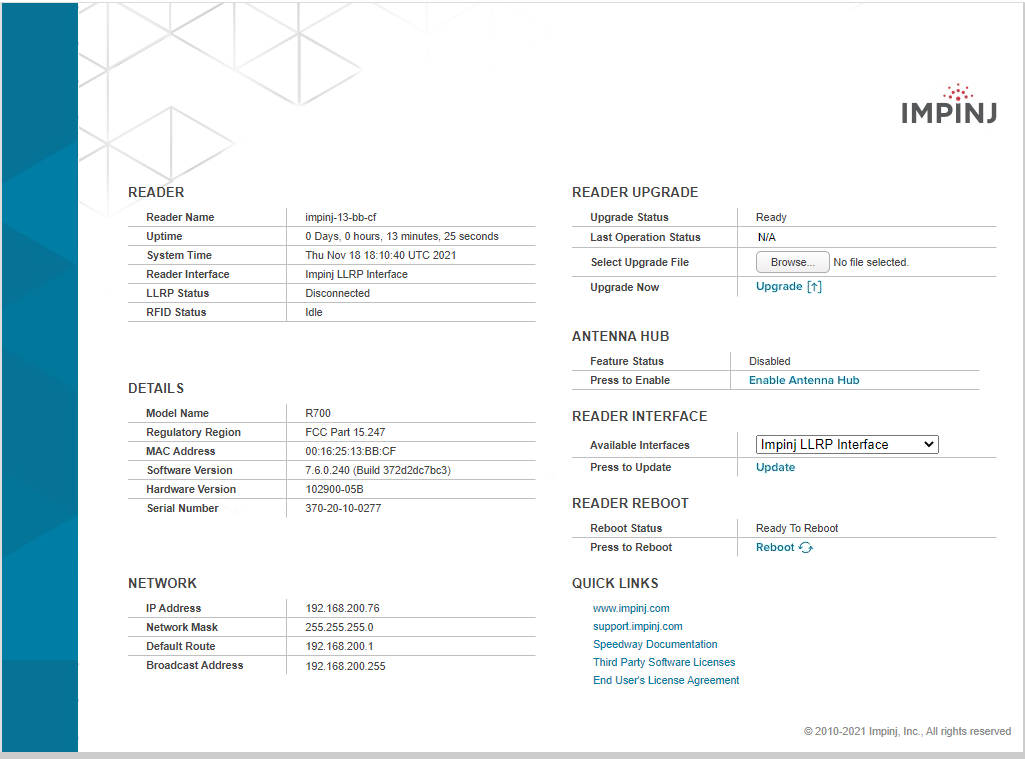
Let's break down each section of the Web UI and see why it is important:
Reader Section
This section shows the status and information about the reader, including reader uptime and whether or not the reader is actively performing an inventory (RFID Status).
Details section
This section shows the reader's name and regulatory region, which must adhere to your allotted UHF frequency range. You can also find your reader's Mac Address, serial number, and hardware version listed here.
Network section
This section shows your reader's network information, like its IP address.
Reader Upgrade section
This is where you can upgrade the firmware on your R700. To get the latest available firmware, please send us an email at support@atlasRFIDstore.com. Download the provided file and extract the .upg file from the file to a folder on your computer. In the web UI, select Browse, and choose the downloaded .upg file. Click Upgrade. After about a minute, the web UI will request a reboot, which you can do by selecting the Reboot button further down on the screen.
Reader Interface section
This section allows you to set the reader to either use the LLRP or IoT interface options for the reader. In short, the LLRP interfaces allows the reader to connect to client-side software applications like ItemTest, while the IoT interface unlocks the reader's ability to use its REST API, MQTT, and Kafka communication protocols.
For more information on setting up and using ItemTest, see Using ItemTest.
For more information on setting this up, see Using MQTT with the Impinj R700 Reader.
Reader Reboot section
This section allows the user to manually reboot the reader, which is a necessary step after upgrading firmware on the reader.
Conclusion
That concludes our article on setting up the Impinj R700 reader. Thanks for taking the time to walk through these steps with us. For information on all things RFID, check out our blog or our RFID resources page. And as always, if you have any questions at all, send us an email or give us a call.